Thursday, November 30, 2017

Chocolate Cups With Moringa Cashew Cream

Sometimes you get a craving for chocolate so strong, you’re crippled by the aching desire for delicious brown gold – which is how you know you’re a chocoholic. But your problems have been solved by these chocolate cups that are the perfect thing to grab before you head out the door in the morning. The rich dark chocolate shell is filled with a moringa cream that subtly complements its bold exterior.

CHOCOLATE CUPS WITH MORINGA CASHEW CREAM [VEGAN, GLUTEN-FREE]

THIS RECIPE IS :

Dairy Free Gluten-free Recipes No Refined Sugar Vegan Wheat Free

Low CALORIES

349

SERVES

9

INGREDIENTS

FOR THE CHOCOLATE:

  • 1 cup unrefined coconut oil
  • 1 cup raw cacao powder
  • 1/2 cup pure maple syrup
  • Pinch of unrefined sea salt

FOR THE MORINGA MATCHA CREAM:

  • 2/3 cup raw cashews, soaked for 2 hours or longer
  • 1/4 cup water
  • 2 tablespoons maple syrup
  • 3/4 teaspoon moringa powder
  • 3/4 teaspoon matcha
  • 1/2 teaspoon vanilla bean powder
  • Pinch of unrefined sea salt

PREPARATION

TO MAKE THE CHOCOLATE:

  1. If your coconut oil is solid, add it to a small pan and let it melt over low heat.
  2. Once melted, remove from heat, add cacao powder to the oil and mix well with a spoon until completely dissolved (no clumps remaining). Add maple syrup and sea salt and stir to combine.
  3. Line a muffin tin with nine muffin cases. Pour liquid chocolate into the cases and fill them up 1/4 way through. Transfer to the freezer or refrigerator for 5-10 minutes until the chocolate sets.

TO MAKE THE MORINGA CASHEW CREAM:

  1. Rinse and drain the soaked cashews. Pour them into the blender with the rest of ingredients and blend until completely silky and smooth.
  2. Take out the tin, add about 2 teaspoons of the cashew cream in the middle of each cup and fill them up with the remaining liquid chocolate. Add more sea salt on top if desired.
  3. Refrigerate for 30 minutes until set (or freeze them if you’re short on time). Store leftovers in the refrigerator or freezer.

Submitted by: BetterHealthLifestyles.com 

The post Chocolate Cups With Moringa Cashew Cream appeared first on Better Health Lifestyles.


from Better Health Lifestyles https://betterhealthlifestyles.com/chocolate-cups-moringa-cashew-cream/

Monday, November 27, 2017

Essential Oil Recipes

Essential oil diffusers are probably the best way to experience the benefits of essential oils. They take pure essential oils and release them into the atmosphere for your inhaling pleasure. Whether you’re feeling blue, have a cold, or need a pick-me-up, there’s an essential oil that is well suited for the occasion. Essential oil diffusers are the perfect vehicle to get the good times rolling.

Single Oils For Your Essential Oil Diffusers

There are plenty of single oils out there that can do amazing things to your atmosphere when used on their own. They can fight many ailments that you might struggle with such as insomnia (lavender), nausea (peppermint), depression (grapefruit), or simply mental fatigue (cinnamon). When you add a few drops of them to essential oil diffusers, you can keep breathing in their health benefits all day and night to help you feel better.

But sometimes, you might need a more powerful combination of oils to beat those blues, or to work other wonders on your spirit. This is where making a blend for your essential oil diffusers comes in.

Making Blends For Your Essential Oil Diffuser

One single oil is good, but a blend can be better. Here are a 10 recipes for blends that can be used in essential oil diffusers.

Top o’ The Morning – Get up and get going every morning by filling essential oil diffusers with a blend that improves your alertness and stimulates you for a happy day. It also works well as a pick-me-up when the afternoon doldrums hit:Top-o-The-Morning-fragrance

  • 4 drops of sweet orange + 4 drops of peppermint


Respiratory Wonder – When you’re so congested that you can’t smell a thing, use this blend for essential oil diffusers to get cleared out.  It’s also great for improving respiratory function:Respiratory-Wonder-oil-blend

  • 2 drops lemon + 1 drop lime + 2 drops peppermint + 1 drop rosemary + 2 drops eucalyptus + 1 drop tea tree


A Welcoming Freshness – Nothing says welcome like a summertime smell that goes right to your head; literally. Essential oil diffusers release the goods from this blend that promotes peace and summer love:A-Welcoming-Freshness-essential-oil-blend

  • 3 drops lavender + 2 drops lemon + 2 drops grapefruit + 2 drops spearmint


De-Stink The Room – In a home, stinky things happen, from pet odors to cooking odors and beyond. (Stinky teen sports uniforms, anyone?) Banish the bad and add odor eliminating power to your essential oil diffuser with:DeStink-The-Room-Aroma-therapy

  • 2 drops lemon + 1 drop tea tree (melaleuca) + 1 drop cilantro + 1 drop lime


Let’s Hear It For The Boy – A rather manly blend that’s reminiscent of the woods and would work well to keep the man-cave smelling clean and fresh, despite the increased sweat and testosterone:

  • 2 drops white fir + 2 drops cypress + 2 drops wintergreen


It’s Allergy Season. Again – Whether you suffer them in the spring, summer, fall or all year-round, allergies can make life miserable. But a essential oil diffuser with this blend can help you blast them and be on the road to breathing better:

  • 3 drops peppermint + 3 drops lavender + 3 drops lemon


Banish The Bugs – We mean the creepy crawlers, or fliers. Essential oil diffusers filled with this can be put on the patio to prevent unwanted visitors of the insect persuasion:Banish-The-Bugs-essential-oil-blend

  • 1 drop lemongrass + 1 drop thyme + 1 drop eucalyptus + 1 drop basil


So-long, Sickness – Use it Fall through Spring to increase immunity and decrease your number of sick days:So-long-Sickness-Aroma-therapy-scents

  • 1 drop rosemary + 1 drop clove + 1 drop eucalyptus + 1 drop cinnamon + 1 drop orange


Calm Down – There are many blends for essential oil diffusers you can use to relax when your nerves are shot, so we’ll give you two since this is such a common ailment:Calm-Down-essential-oil-blend

  • 2 drops frankincense + 2 drops bergamot + 2 drops vetiver + 2 drops cedarwood


Sleep Tight – End the day on a perfect note with a good night’s sleep. A few drops and you’ll be off to nod before you know it:Sleep-Tight-essential-oils

  • 2 drops lavender + 2 drops chamomile + 2 drops marjoram


The more you learn about essential oils, the easier it will be to make your own blends and create something that is unique to you and your needs.  Essential oil diffusers can become a wonderful addition to your life. With benefits that range from relaxation to energy stimulation and more, it’s a way to make your home smell better and your whole life a little bit healthier.


Contributed by: BetterHealthLifeStyles.com

The post Essential Oil Recipes appeared first on Better Health Lifestyles.


from Better Health Lifestyles https://betterhealthlifestyles.com/essential-oil-recipes/

Wednesday, November 22, 2017

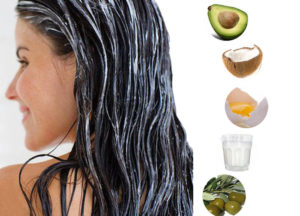
DIY Hair Mask for Stronger Hair

With exposure to things like the weather, less than great water, hair care products, and heat tools, hair can take a beating. A DIY hair mask is a great addition to any hair care regimen.

Why Use a DIY Hair Mask?

Shampoo and conditioner may not be enough to counteract everything we put our hair through. Even those who regularly consume nutrient-dense foods like collagen and bone broth might notice their hair needs some extra love. A natural shampoo and conditioner keeps hair clean and moisturized, but a protein-rich hair mask adds strength and shine.

While you can buy a hair mask, the kitchen is full of ingredients with properties that nourish and strengthen hair. Why not just mix a little up when needed? Bonus: You’ll know exactly what’s in your (100% natural) DIY hair mask!

How a Hair Mask Works

Before I delve into what’s in this hair mask to strengthen hair, it helps to know why I’m recommending these ingredients. The hair follicle and root are composed primarily of collagen. This is why consuming collagen-rich foods and a high quality collagen powder helps so much with hair growth and health. The hair itself is 91% protein, so coating it in protein gives it what it needs to rebuild.

DIY Hair Mask Ingredients

Raw Free-Range Egg

The iconic egg shampoo was popular for a reason. While the proteins found in egg are too large to effectively bind with hair, they’re chock full of other vitamins and minerals that nourish hair and scalp. Eggs from less than healthy animals won’t have as good of a nutritional profile, so free range eggs are best.

  • Vitamins A, B-complex, D and E
  • Folate
  • Pantothenic acid
  • Calcium
  • Iron
  • Phosphorous
  • Selenium
  • Zinc
  • Potassium
  • Cholesterol, healthy fats and omega-3s

Gelatin

This ingredient is really the star of the show here. I love using gelatin for so many things, from homemade healthy marshmallows, to vitamin rich fruit snacks. However, it’s also fabulous for hair. The proteins in gelatin readily bind to hair to repair damage and really help this hair mask to strengthen hair. Twelve of the top thirteen amino acids that comprise our hair shafts are also found in gelatin.

Raw Honey

Raw honey is another ingredient that goes into many of my food, DIY beauty, and natural health recipes. This unique ingredient does everything from clearing blemished skin to soothing a sore throat. While protein adds strength to hair, too much can make it brittle. Adding honey helps keep the hair soft and flexible.

Essential Oils

These are optional, but really help to amplify the benefits. Plus they help hair smell amazing! Lavender, rosemary, cedarwood ,and ylang ylang are all good choices.

Horsetail Herb

This plant is also known as scouring rush, or shavegrass. Because of its rigid nature, it used to be used as a scrubbing tool. It’s high in silica and other hair-healthy minerals like magnesium, potassium, and bioflavonoids that are best extracted in a water infusion. The silica not only makes the plant strong but hair, teeth, and nails as well.

Strengthening DIY Hair Mask Recipe

Ingredients

  1. Heat 1/3 cup of water to a simmer. Add the horsetail, cover and let infuse for 5-10 minutes. Strain and set aside.
  2. Add 1/4 cup of room temperature water to a shallow bowl and sprinkle the gelatin over top. Allow this to gel for a few minutes, then whisk in the hot horsetail infusion.
  3. In a small bowl thoroughly combine the honey and essential oils, then add the gelatin mixture to the honey. Keep stirring until you no longer see tiny bubbles, as this means it’s mixed. The honey helps to safely disperse the essential oils into the hair mask. If not using any essential oils, then just add the honey straight to the gelatin mixture.
  4. Whisk the egg in. You want to make sure that the gelatin mixture isn’t too hot when adding the egg, or you’ll end up with scrambled egg in your hair mask!

How to Use

  1. Apply the prepared hair mask liberally to the hair until all strands are thoroughly coated.
  2. Allow the mixture to sit on the hair for 5-10 minutes, but don’t let it dry. A shower cap can be used to keep the hair moist if you want it on the hair for longer.
  3. Thoroughly rinse out. Follow up with an apple cider vinegar rinse if needed to remove all of the hair mask.

DIY Hair Mask Tips

  • If the hair is a little stiff afterwards, then apply a little coconut oil to your palms, and massage over the hair. Or use a conditioner and rinse as usual.
  • This mask can be used up to once a week, or less frequently if hair becomes stiff with once a week use.

Do you use hair masks for healthier hair? Do you have a favorite DIY hair treatment? Please share!


Contributed by: BetterHealthLifestyles.com 

The post DIY Hair Mask for Stronger Hair appeared first on Better Health Lifestyles.


from Better Health Lifestyles https://betterhealthlifestyles.com/diy-hair-mask-for-stronger-hair/

Tuesday, November 21, 2017

SUCCESSFUL NUTRITION & FITNESS AS YOU TRAVEL

One of the most difficult things we can do is attempt to be conscientious about our health and wellness as we travel. Lucky for you, it’s easier than you might think! In fact, all it takes is being well-prepared and incorporating proper nutrition and physical activity into your travel plans.

Here are 7 easy tips to help you maintain your journey to a healthier lifestyle before you embark on your next flight.

Health-tips-for-traveling

Tip #1: Load up that carry-on! Assemble yourself an arsenal of healthy snacks like fruit, nuts, prepackaged protein (tuna fish, chicken), raw yams cut up like carrots, chopped jicama in a snack baggie, oatmeal, or breakfast packaged into individual serving sizes for each morning (assuming breakfast isn’t provided). When you get hungry, break out these snacks and you will be better equipped to skip the airport candy bars!

Tip #2: Pack your resistance bands. They are lightweight, take up very little space, and can provide total body workouts right from your hotel room. Band workouts are also great for keeping your body supple after long travel hours and keeping you energized throughout your trip.

Tip #3: Healthy, nutritional products are a must! Don’t forget your individual packets of healthy fitness supplementsnutritional products, and high-quality protein bars!  They will definitely enhance your travel experience by keeping your immune system awake and ready to take on whatever your trip holds!

Tip #4: Eat smart while you are on the run. If you have breakfast provided in the hotel, stick to eggs, salsa, fruit, and a healthy carb such as oatmeal/cinnamon or an English muffin. Avoid carb-heavy meals like waffles, pastries, and juice—waffles are the equivalent to consuming donuts for breakfast. And remember, too much of anything can be harmful to your health. If you are consuming more than a daily recommended dose of sugar at breakfast alone, you are doomed to have cravings and most likely eating more throughout the day—which, in turn, will affect your energy and fat loss goals. If you must eat out, try ordering grilled meats, lowering high starch carbs, and adding fruit to help lower sugar cravings.

Tip #5: Book a hotel near a grocery store so you have access to healthy food. Stock up the fridge inside your hotel room with these good foods and avoid the nutritional dangers of eating out. If you are unable to pack fruit to your final destination, purchase it on your way from the airport to your hotel. If you are prepared, you will succeed!

Tip #6: Stay close to a gym if one is not provided by your hotel. Mixing up your routine is always a great idea because it keeps your body adapting. Visiting new or hotel gyms will sometimes force us to change up our workouts, causing our bodies to guess what may come next. Don’t be surprised if you get muscle soreness just by simply trying new machines and exercises in a gym that you are unfamiliar with.

Tip #7: Suck it in. While sitting on a long flight, shuttle, or car ride, try squeezing your glutes and holding in your core, pulling your belly button towards the back of your spine for several minutes at a time. If you are stuck in a sedentary position, you might as well get a workout in that doesn’t require any additional time commitment. This can be a very discreet, quiet, and fun challenge. The person next to you will have no idea that you are burning double the calories that they are just by “sucking it in.”

The next time that you travel, try any one of these and see if your trip is a little less stressful by having some great tools at your fingertips!

Contributed by: BetterHealthLifestyles.com

The post SUCCESSFUL NUTRITION & FITNESS AS YOU TRAVEL appeared first on Better Health Lifestyles.


from Better Health Lifestyles https://betterhealthlifestyles.com/successful-nutrition-fitness-travel/